

IceCap Single Reverse Osmosis Canister Package
SKU: IP-RI-SC100
- Universal Multi-Stage Expansion: Engineered to effortlessly splice an extra filtration stage anywhere before or after your primary reverse osmosis (RO) membrane housing.
- Standard 10-Inch Filter Geometry: Features a industry-standard 10" structural profile that accepts all standard sediment blocks, carbon blocks, and refillable DI resin cartridges.
- Durable Clear Canister Styling: Built with a high-tensile, heavy-duty clear polymer body that allows for instant visual checks on filter coloration and exhaustion.
- Universal 1/4-Inch Push Connections: Outfitted with 1/4" quick-connect ports to splice effortlessly into IceCap water units and almost all major third-party RO/DI brands.
- Flexible Wall-Mount Bracket: Includes an integrated top structural mounting plate for secure attachment to walls, framing, or existing filtration frames.
- Ready-To-Install Plumbing: Shipped complete with push-fit internal line adapters and a segment of polyethylene tubing to make the plumbing upgrade fast and leak-free.

IceCap
Premium aquarium equipment without the premium price. Protein skimmers, pumps, reactors, heaters & more.
IceCap Single Canister Expansion Package
The IceCap Single Canister Package (SKU: IP-RI-SC100) is an authentic, highly versatile water-filtration expansion module distributed by CoralVue to maximize the customization and efficiency of residential reverse osmosis and deionization (RO/DI) systems. Many default multi-stage aquatic filters struggle when faced with specific regional water challenges, such as heavy rust sediment from old piping or high concentrations of complex chloramines bound by local municipal facilities. Instead of replacing your entire filtration unit, the IP-RI-SC100 allows you to cleanly add a targeted protective stage. Splicing this single housing into your line gives your system the exact extra layer of defense needed to keep your water pristine.
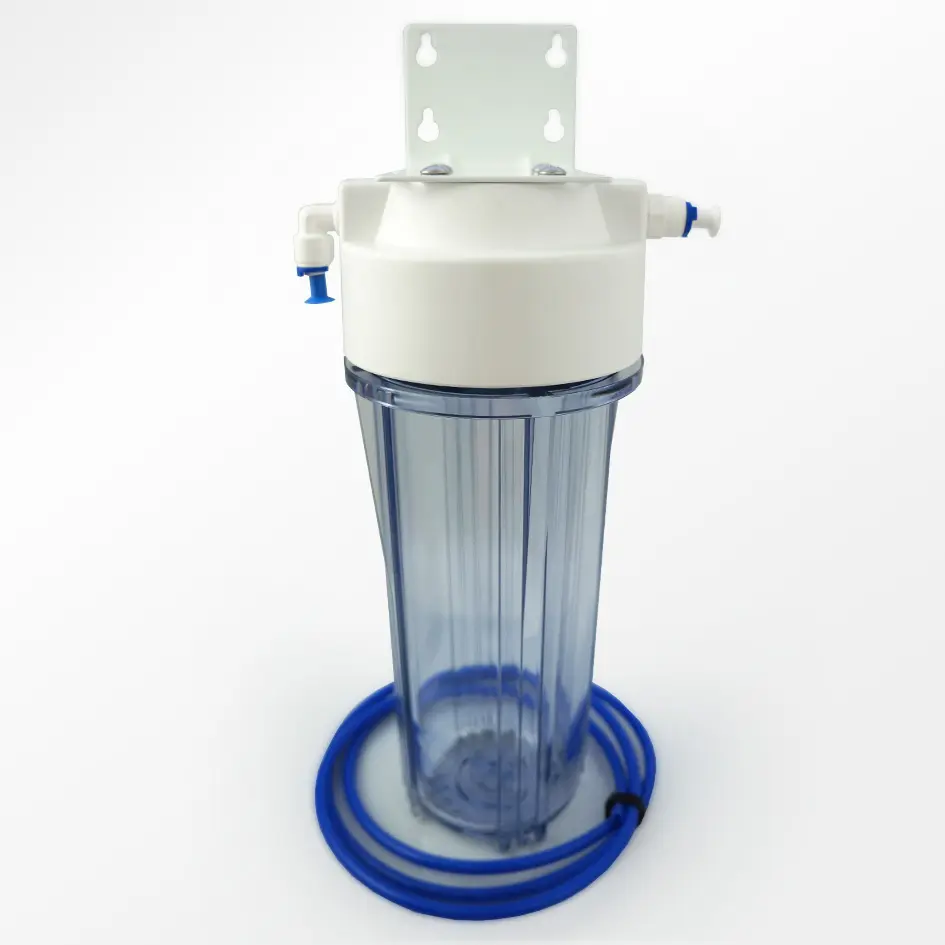
This package features a commercial-grade 10-Inch Clear Filter Canister paired with an integrated mounting cap. The clear housing design provides an excellent operational benefit, allowing you to instantly visually check filter wear—such as tracing a sediment block turning brown or monitoring color-changing DI resin breakthrough—without constantly shutting down water lines to unscrew the housing. It can be positioned at the front of your system as a heavy-duty sediment pre-filter, placed between carbon blocks to neutralize chloramine bonds, or mounted at the very end of your filtration line to act as a post-membrane polishing deionization cell. Ready to deploy out of the box, this package helps reef aquarists and high-tech planted tank hobbyists lock in absolute 0 TDS water.
Key Features
Tailored Water Optimization: Gives you complete freedom to add specialized media cartridges like carbon, sediment sheets, or custom DI resin mixes.
Bypasses Threaded Leak Points: Features integrated 1/4-inch push-connect fittings that lock lines tight, removing the need for messy Teflon tape wraps.
Rugged Heavy-Duty Wall Mount cap: Thick top plate molding handles continuous internal water line pressures without flexing or cracking at the mount seams.
(Note: This retail package includes (1) clear 10-inch canister housing with bracket cap, (1) segment of 1/4" polyethylene tubing, and quick-connect fittings. Replacement sediment cartridges, carbon blocks, refillable DI resin inserts, and canister wrenches are sold under separate product categories).
What’s Included:
(1) IceCap 10-Inch Clear Filter Canister Body
(1) Heavy-Duty Top Mounting Cap with Built-In Bracket Holes
(1) Segment of 1/4-Inch Outer Diameter Polyethylene RO/DI Tubing
(2) Quick-Connect 1/4" Push-Fit Line Adapters
Technical Specs:
Official Manufacturing Title: IceCap Single Canister Package
SKU / Factory Part Identifier: IP-RI-SC100
Compatible Canister Cartridge Standard: Standard 10-Inch Profile (10" x 2.5")
Input/Output Fitting Splicing Size: 1/4-Inch Push-Connect Grid
Canister Transparency Profile: 100% Optical Clear Polymer
Maximum Rated Handling Pressure: 120 PSI
Product Weight (Dry Frame): 16 oz (1.0 lb)
Overall Physical Dimensions (HxWxD): 14.0" x 4.0" x 4.0" (14.0in×4.0in×4.0in)
Warranty
CoralVue, Inc. hereby guarantees this product to be free from defects in material and workmanship for a period of:
- 1 Year
Warranty is activated on the date of purchase.
This Standard Limited Warranty applies and is limited as follows:
- To the product only as long as it remains in the possession of the original purchaser.
- To the product that has not been subject to accident, misuse or abuse.
- To the product that has not been modified, altered, defaced, or had repairs made or attempted by other than CoralVue, Inc.
- That CoralVue be immediately notified in writing within ten (10) days of first knowledge of defect by owner or his agent.
- That CoralVue, Inc. shall be given first opportunity to make any repairs, replacements or corrections to the defective construction within a reasonable period of time.
- Under no circumstances shall CoralVue and/or the Manufacturer be liable by virtue of this warranty or otherwise for damage to any person or property whatsoever for any special, indirect, secondary or consequential damages of any nature however arising out of the use or inability to use because of the product defect.
- Unbox your IceCap Single Canister Package. Shut off the cold-water feed line valve leading to your RO/DI unit and bleed off remaining internal system pressure by cracking open your product output line.
- Select your targeted plumbing location based on your filtration goal. To catch heavy sediment: place it before your first sediment stage. To fight chloramines: insert it between your carbon blocks. To polish TDS to zero: install it after your RO membrane output.
- Mount the canister top bracket securely to your backing wall or filter rack structure using appropriate mounting hardware screws (not supplied).
- Drop your chosen 10-inch filter block or filled refillable DI cartridge into the clear canister base. Make sure the rubber gasket rings at the top and bottom of the filter cartridge seat correctly centered over the internal alignment pins.
- Check that the black O-ring seal inside the upper canister rim is lubricated and sitting flat. Screw the clear canister base clockwise into the mounted top cap until it is hand-tight. Do not over-tighten, as this can pinch and warp the rubber O-ring seal.
- Use a clean razor blade to cut your existing 1/4" RO line cleanly at a 90-degree angle. Push your feed line firmly into the Inlet port of the new canister cap, and connect a clean piece of tubing from the Outlet port back into your main filtration line. Turn on your water feed slowly and inspect all push-fit seams for drips.
Pro Tips:
- Flush New Carbon Blocks into a Utility Bucket Before Routing Water to Your RO Membrane. If you are installing the IP-RI-SC100 to add a secondary carbon block to your system, always perform an initial flush before finishing your final plumbing. Brand new carbon blocks naturally shed a fine cloud of black ash dust when water first flows through them. If this dust travels down your lines, it can clog the micro-pores of your expensive Reverse Osmosis membrane, reducing your pure water production. Disconnect the output line from your new canister and run water through it into a bucket until it runs crystal clear before plugging it back into your system.
- Rotate an Added DI Canister into the Second Position for Maximum Resin Efficiency. When adding this package to serve as an extra deionization (DI) stage for zero-TDS polishing, always configure your canisters in a series layout. Place your old DI canister in the first position to take the primary ion load coming off your RO membrane. Place the new IC-RI-SC100 canister right behind it as a final polisher. Once your first canister's color-changing resin completely exhausts, empty it, refill it with fresh bulk resin, and rotate it into the second position, shifting the half-used polishing canister to the front. This rotation routine saves money by ensuring you use every ounce of your resin.
- Apply a Thin Layer of Silicone Lubricant to the Canister O-Ring to Prevent Leaks. Whenever you open your clear canister to swap out an exhausted filter cartridge, take a close look at the black rubber O-ring nestled within the upper rim threads. Over months of use under constant water pressure, this rubber ring can dry out, flatten, or bunch up when twisted, leading to slow, annoying drips. Wipe the O-ring clean with a cloth and apply a very thin smear of 100% pure food-grade silicone lubricant. This keeps the rubber pliable, creates an air-tight seal, and makes unscrewing the canister for future filter changes much easier.