

Thank You for Your IceCap Purchase
We appreciate your confidence in IceCap. If anything is missing, you have an issue with the product, or you just have a question, please contact our support team at support.coralvue.com.These instructions are for IceCap High Output Inline UV Sterilizers (IC-HOUV-27W, IC-HOUV-40W, and IC-HOUV-90W).
About Your UV Sterilizer
The IceCap UV sterilizer works in saltwater, freshwater, and ponds. It helps control, and can even eliminate, parasites, algae, fungi, bacteria, and protozoa without chemicals or biocides.
When it is set up, maintained, and operated properly, free-floating microorganisms are killed as water passes through the sterilizer. The high-output UV lamp emits a wavelength that disrupts the DNA or RNA of single-celled organisms.
Important UV Warning
Follow basic safety precautions whenever you install or use electrical equipment.
- UV light can damage your eyes and skin. Never handle or look at an operating UV lamp.
- Unplug the unit when it is not in use, and before any servicing or cleaning.
- If you see any sign of water leakage, unplug the unit immediately.
- Always use the sterilizer with a properly grounded GFCI outlet.
- If you need an extension cord, use one with an adequate rating. A cord rated for fewer amps or watts than the unit may overheat. If in doubt, consult a qualified electrician.
Before You Install: Inspect Everything
Each IceCap UV sterilizer ships with everything needed to run it. Unpack it carefully and check that every part is included and undamaged. The quartz sleeve and UV lamp are fragile and may have been damaged in shipping. Inspect the unit before you install it or connect power.
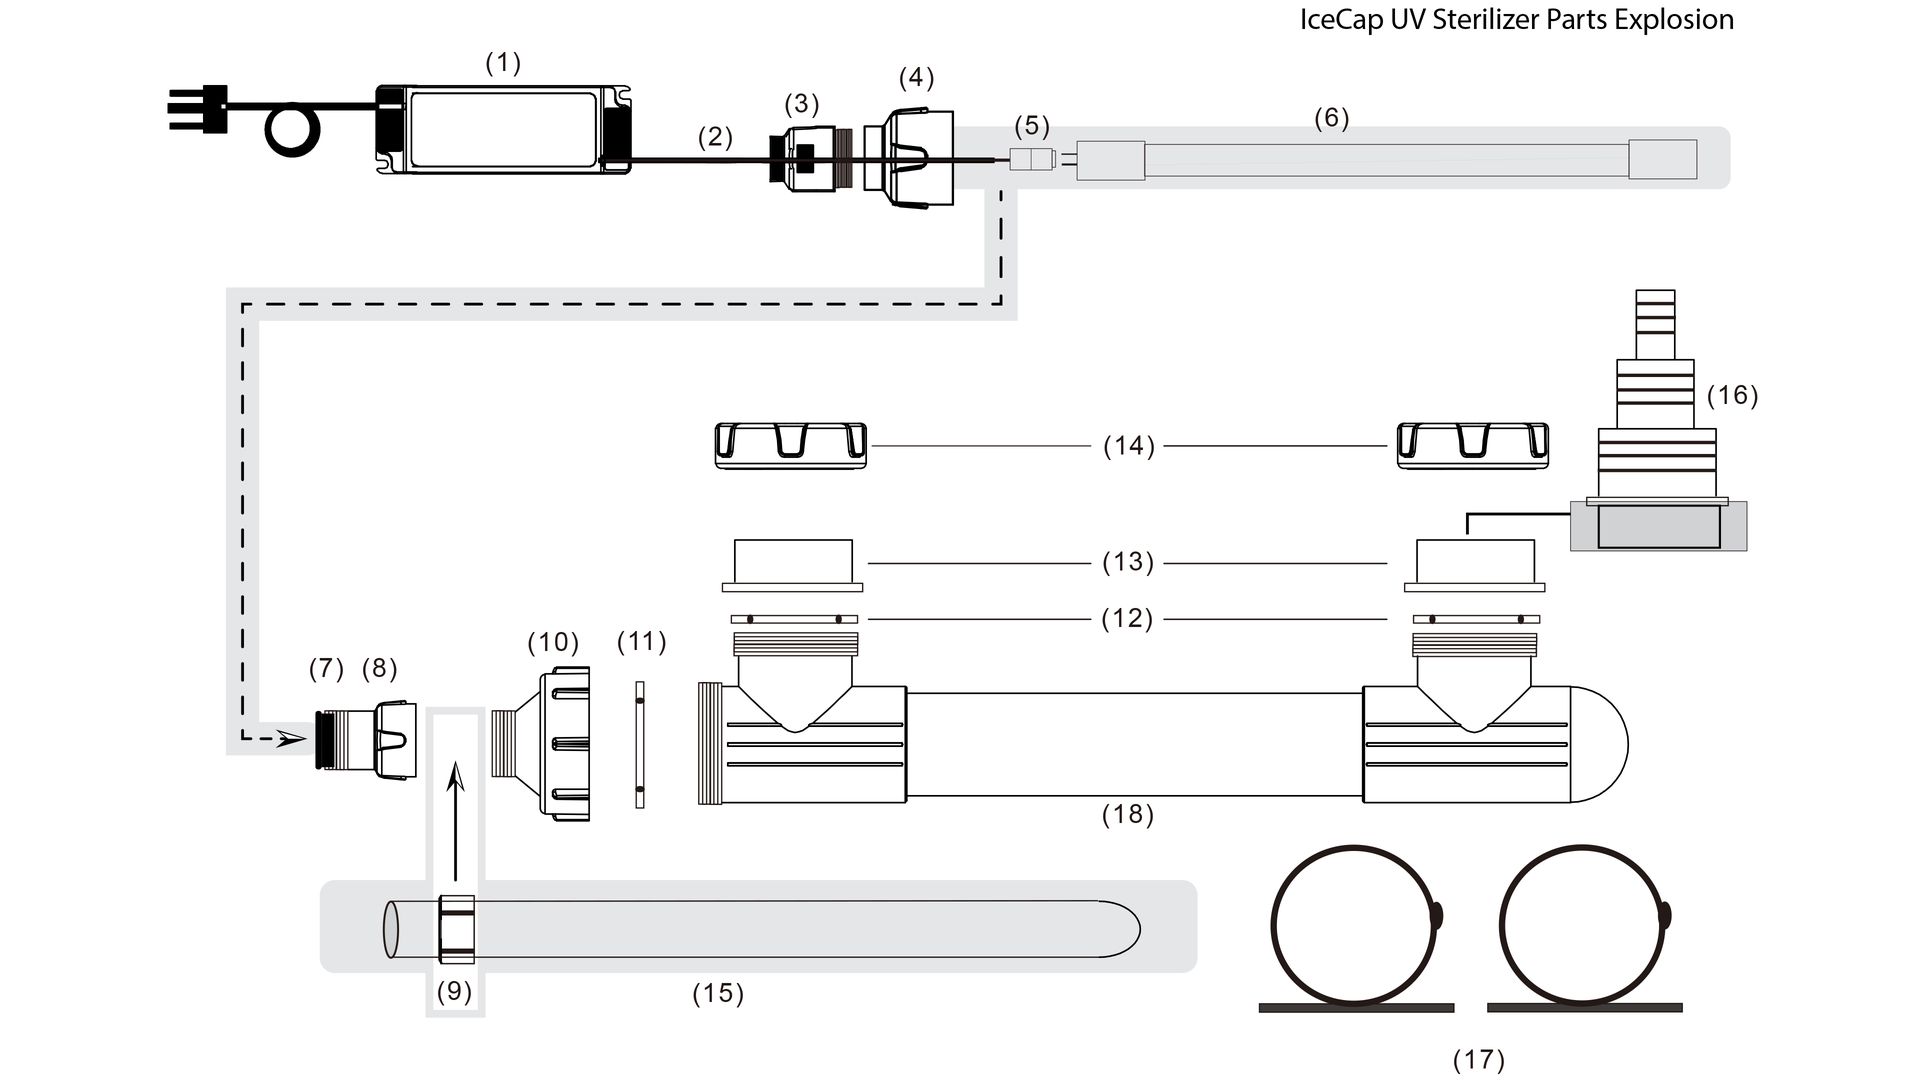
Parts list
- Electronic UV lamp ballast
- Lamp cord
- Cord retainer
- Transition to ballast nut
- UV lamp socket
- High-output UV lamp
- Quartz sleeve housing nut insert
- Quartz sleeve housing nut
- Gasket for quartz sleeve
- Vessel cover
- Seal for vessel (flat)
- O-ring for input/output
- 2" PVC slip adapter
- Retaining nut for input/output
- Quartz sleeve
- Barb fitting*
- Vessel mounting clamps
- UV vessel
*If you install the barb fitting, it must be glued to the PVC adapter (part 13).
Mounting the Sterilizer
How you mount the sterilizer affects both performance and safety. Follow these guidelines exactly. Trapped air inside the vessel creates excess heat and can damage the internal components and seals.
Vertical mounting
- Position the unit with the electrical end facing up.
- Keep the vessel straight and upright.
- Use the bottom port as the inlet and the top port as the outlet.
Horizontal mounting
- Position the inlet and outlet facing upward.
- If the unit isn’t perfectly level, keep the electrical end higher than the other end.
- Use the lower port as the inlet.
Power supply
- The power supply is not waterproof. Never mount it over water or submerge it.
- Don’t bury it where heat and moisture can build up.
- Use the mounting clips on its ends and two screws (not included) to mount it out of the way, within reach of the sterilizer.
Plumbing
How you plumb the sterilizer is up to you. Most people splice it into the return line, usually after a return pump or canister filter.
- Use standard 2" PVC from any hardware store.
- You can reduce the inlet and outlet sizes to match your system.
- A bypass assembly gives you better flow control and makes servicing easier.
Optional flexible hose adapters
Molded barbed fittings are available for 1/2", 3/4", or 1" flexible hose.
- If needed, trim the fitting for maximum flow. Cut in the gap between barb levels with a hacksaw or serrated knife.
- Glue the slip end of the barbed fitting to the PVC adapter.
- Add hose clamps over the tubing (recommended, not included).
Choosing the Right Size and Flow Rate
IceCap 27W
- Max flow, marine: 600 gph
- Max flow, freshwater: 1,500 gph
- Max volume, marine: 140 gal
- Max volume, freshwater: 1,300 gal
IceCap 40W
- Max flow, marine: 1,000 gph
- Max flow, freshwater: 3,000 gph
- Max volume, marine: 400 gal
- Max volume, freshwater: 3,000 gal
IceCap 90W
- Max flow, marine: 3,000 gph
- Max flow, freshwater: 12,000 gph
- Max volume, marine: 1,000 gal
- Max volume, freshwater: 12,000 gal
Recommended flow by goal
IceCap 27W
- Bacteria and algae: 480 gph
- Parasites: 160 gph
- Aquarium size: 160 gal
IceCap 40W
- Bacteria and algae: 940 gph
- Parasites: 300 gph
- Aquarium size: 300 gal
IceCap 90W
- Bacteria and algae: 1,890 gph
- Parasites: 630 gph
- Aquarium size: 630 gal
Bacteria and algae: Aim for 3 to 4.5 times your total tank volume per hour. For a 50-gallon tank, that’s 150 to 225 gph through the sterilizer.
Parasites (Ich, flukes, and others): Parasites need more exposure time, so slow the flow by 50 to 75% compared to the settings above. Aim for 0.5 to 1.5 times your tank volume per hour. For a 50-gallon tank, that’s 25 to 75 gph.
Initial Assembly: Installing the Quartz Sleeve
Important: Installing the blue seals correctly and leak testing are critical. Do not skip these steps.
Step 1: Install the blue seal
- Make sure the blue seal is level with the rim of the quartz sleeve.
- Push the seal down the quartz sleeve evenly and into the vessel cover (part 10). The seal must be pushed fully up into part 10.
- Lock the quartz sleeve housing nut (part 8) onto part 10.
Step 2: Do a simple leak test
- Pour water in to check that the seal holds.
- If it leaks, check that the blue seal is pressed evenly into part 10.
- If there’s no leak, move on to Step 3.
Step 3: Seat the quartz sleeve in the vessel
- Insert the quartz sleeve into the groove at the center bottom of the UV vessel (part 18).
- With the flat blue seal (part 11) in place, lock part 10 tightly onto the vessel.
Leak Test Before Installing the Lamp
Do this test before you install the lamp and ballast, and every time you open the vessel.
It confirms that the critical seal (part 9) between the quartz sleeve and the vessel is working. If this seal fails, water can get inside the quartz sleeve and damage the lamp and electrical parts, which can create a dangerous situation.
- Leave the dry components out (lamp, socket, ballast).
- Run water through the unit.
- Check for any visible leaks.
Installing the Lamp and Power Harness
- Check the seal. Make sure the quartz sleeve housing nut is tight (clockwise). This forms the master seal. Confirm the housing nut insert is in place before you install the lamp.
- Insert the lamp. Carefully slide the UV lamp into the quartz sleeve. Leave enough of the lamp sticking out to grip while you connect the ballast cord.
- Connect the lamp to the socket. While holding the lamp, push its prongs into the socket on the ballast cord. If the pins don’t line up, rotate the lamp until they do. Then push the connected socket and lamp into the quartz sleeve until the lamp touches the bottom.
- Loosen the cord retainer. Turn the nut counterclockwise so it slides freely along the ballast cord.
- Attach the transition to ballast nut. Thread it clockwise onto the UV vessel. Hand-tighten only and never use tools. This connection is not meant to be watertight.
- Tighten the cord retainer. Thread it clockwise until it grips the cord firmly. Don’t overtighten.
Powering On
- Once you’ve confirmed there are no leaks, plug the ballast into a GFCI-protected outlet.
- When the lamp is running, you should see a glow through the electrical end of the fixture.
- The ballast also shows a green status light while operating.
Maintenance
Over time, the sterilizer becomes less effective. The lamp loses output, and the quartz sleeve can gather mineral deposits and turn cloudy.
Replace the quartz sleeve, UV lamp, and blue vessel seal every year to keep the unit working like new. A good sign it’s time to replace them is algae growing faster on the glass, rock, and other surfaces.
Troubleshooting
Red light and an audible alarm when you plug in the ballast
Cause: The ballast is signaling an ignition failure, usually from a bad lamp.
Fix:
- Unplug the unit.
- Check that every lamp connection is fully seated and shows no visible damage.
- Plug it back in. If the alarm continues, replace the lamp.